Creating a Standard Works Order – Make for Customer
Select the Works Order button in the main menu, select the ![]() button to start creating a new order
button to start creating a new order

Use the looking glass button ![]() to open the customer search window, select relevant customer. If the customer does not already exist, use the
to open the customer search window, select relevant customer. If the customer does not already exist, use the ![]() button, to create a new customer account. Use the looking glass button
button, to create a new customer account. Use the looking glass button ![]() to open the parts database; if the part is not already in the parts database use the
to open the parts database; if the part is not already in the parts database use the ![]() button to add a new part record. If the part is ‘one off’ there may not be the requirement to include in the database therefore inserting the detail in the New Works Order window will suffice N.B. part detail entered within the works order will not update the parts database.
button to add a new part record. If the part is ‘one off’ there may not be the requirement to include in the database therefore inserting the detail in the New Works Order window will suffice N.B. part detail entered within the works order will not update the parts database.
Enter the Order Quantity, tabbing across to Build Quantity will duplicate the value, adjust accordingly.
Use the drop down arrow to the side of Delivery Date to enter relevant date.
Enter Customer Order detail, this could be the customer purchase order
Enter Item detail, this could be the first item for a customer multiple item order
If the works order is to be saved as a template or the top level of an assembly, tick either box as applicable.
Select OK to close the window and the new works order will open.
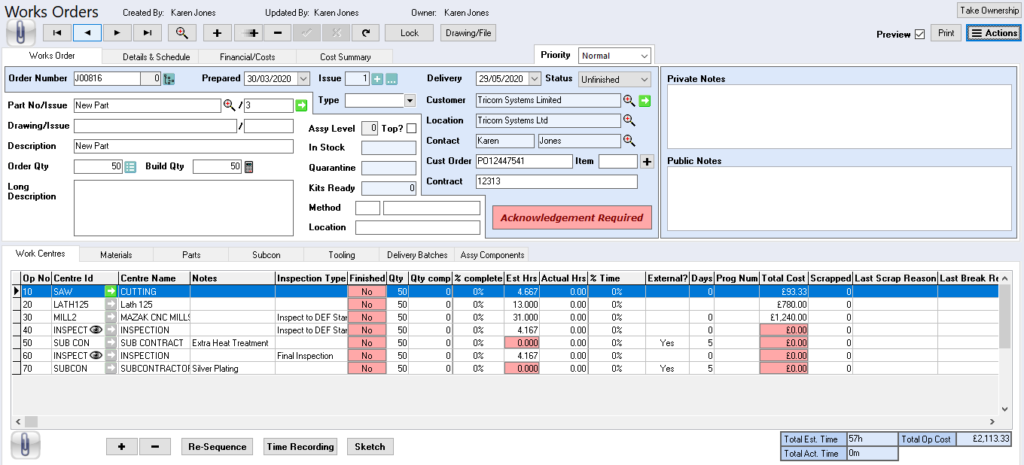
Works Order Tab
The Order Number is assigned from the number stacks within setup, the second field is used to identify the level of an assembly (if applicable). Prepared field will be automatically populated with date the works order has been created.
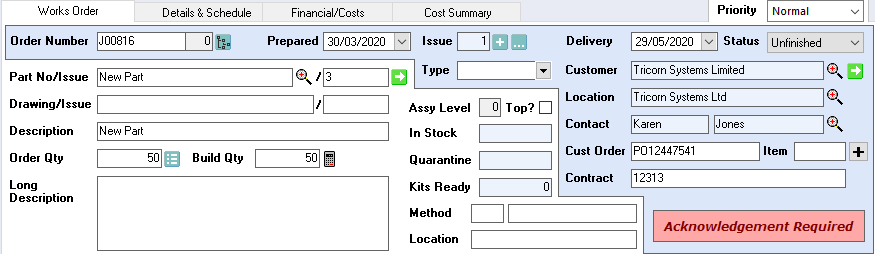
All information will be populated with the detail from the New Works Order window.
Additional information can be added to support the detail of the works order. The above illustration indicates the minimum requirement for a standard works order.
Type – this is a self-learning drop down and can be used to sort works orders in the search window and reporting purposes.
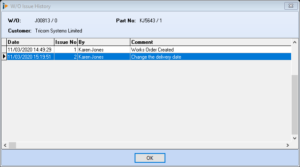
Issue – initially this is set to 1, any logged changes to the works order this number will increment. It is used to identify if the original works order has been changed and the reasons why. Each change will increment the number count and a full record of the content can be viewed using the ![]() button. Please Note: this process is manual.
button. Please Note: this process is manual.
Select the ![]() button to add a new issue record, the record will contain the login details date and time, enter all applicable text in the comments field.
button to add a new issue record, the record will contain the login details date and time, enter all applicable text in the comments field.
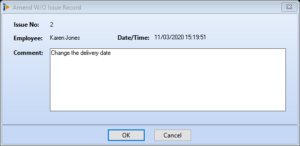
Enter all applicable text in the comments field, the date, time and owner of the change will be automatically populated.
Method – this requires a level of discipline as the detail has to be consistent when entered. The first field is numeric only with the second field a description of the numbering used. Within the search window enter the number used in the Method field to sort by.
Location – this is a free type field and can be used for anything a customer requires, Tricorn Systems will assist with this usage.
Order Acknowledgement – this button can be used to create printed order acknowledgements, once the print has been produced the button will change from Order Acknowledgement (coral colour) to Acknowledged (pale blue)
![]()
Printing the Order Acknowledgement
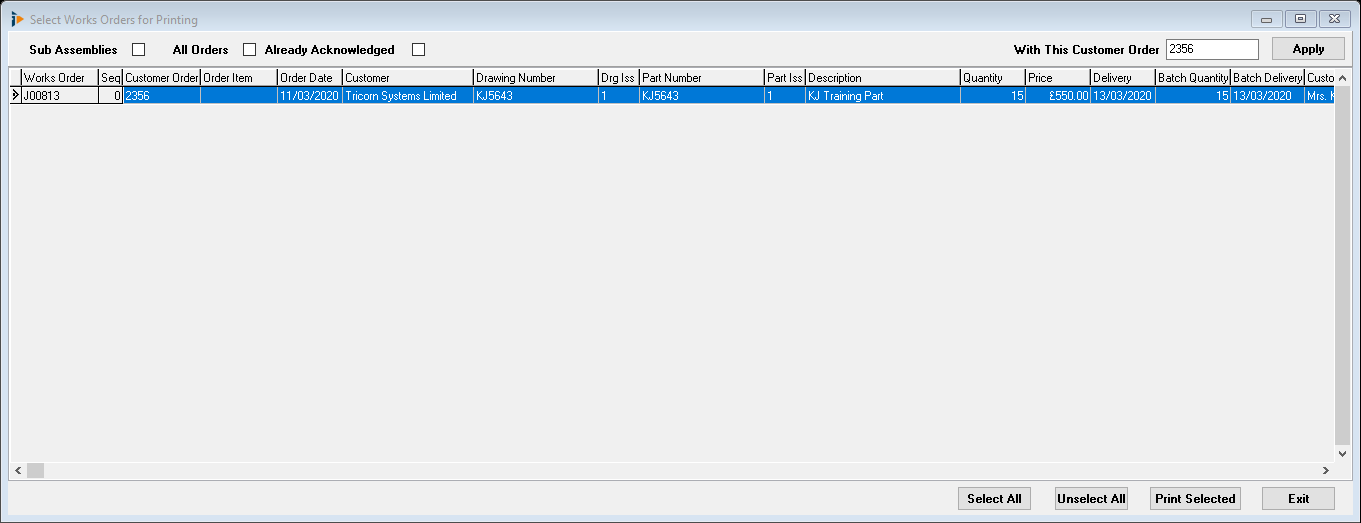
Select the Acknowledgement Required button, the following table will open. The table will include all works orders that have the same Customer Order, select all lines to be acknowledged.
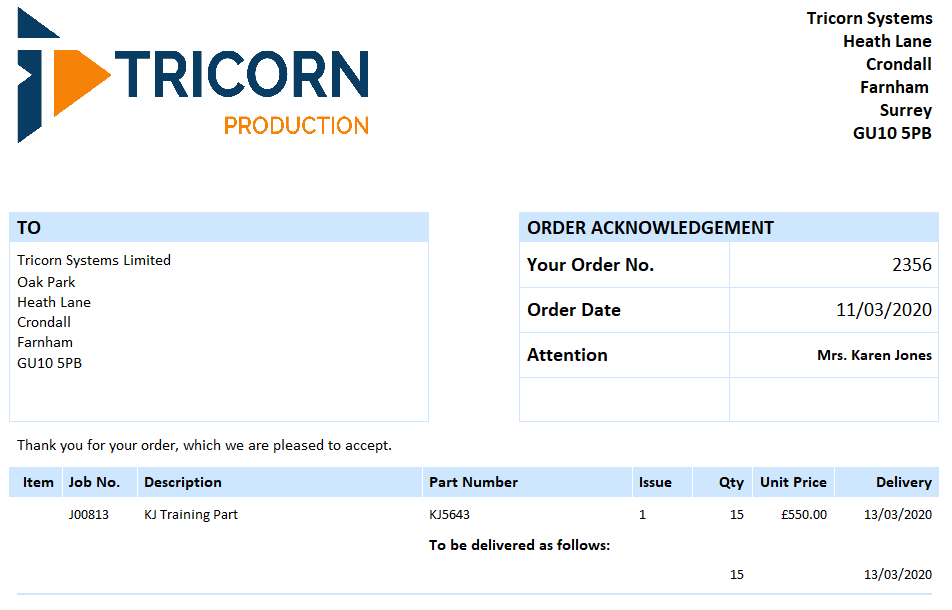
The printed Order Acknowledgement will contain confirmation of the works order detail, including the customer order number, order date, the parts to be supplied, quantity ordered, unit price and the delivery schedule. At the bottom of the order will be trading terms and conditions and relevant signatures of the individual submitting the acknowledgement.
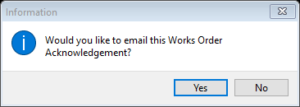
An option to send by email will be prompted
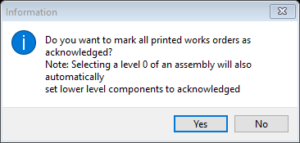
Confirmation of the acknowledgement
Details and Schedule
Notes
Financial/Costs
Cost Summary
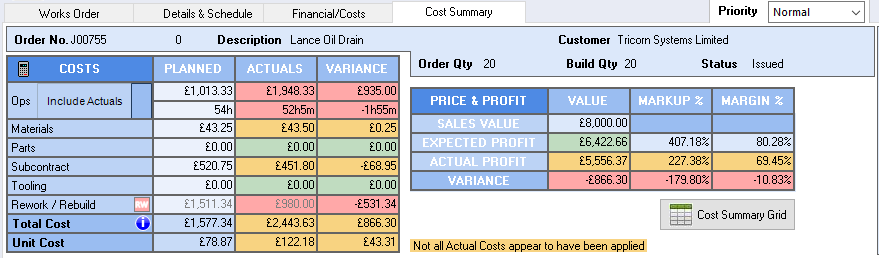
The Cost Summary tab can be restricted within the parameter settings, it contains the profit and loss for the individual works order.
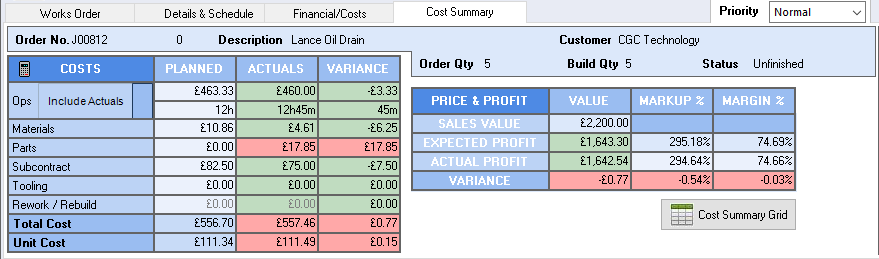
The table contains the estimated costs, displayed as Planned, these include all labour, materials, parts, subcon and tooling. When posting the relevant actual costs these will populate the Actuals column, the Variance column displaying the difference between the two figures. Any Rework or Rebuild costs will be shown on a different line.
The costs are accumulated on the original works order, however the rework job will display the costs for the rework. Reworks have a suffix of ![]() and Rebuild a suffix of
and Rebuild a suffix of ![]()
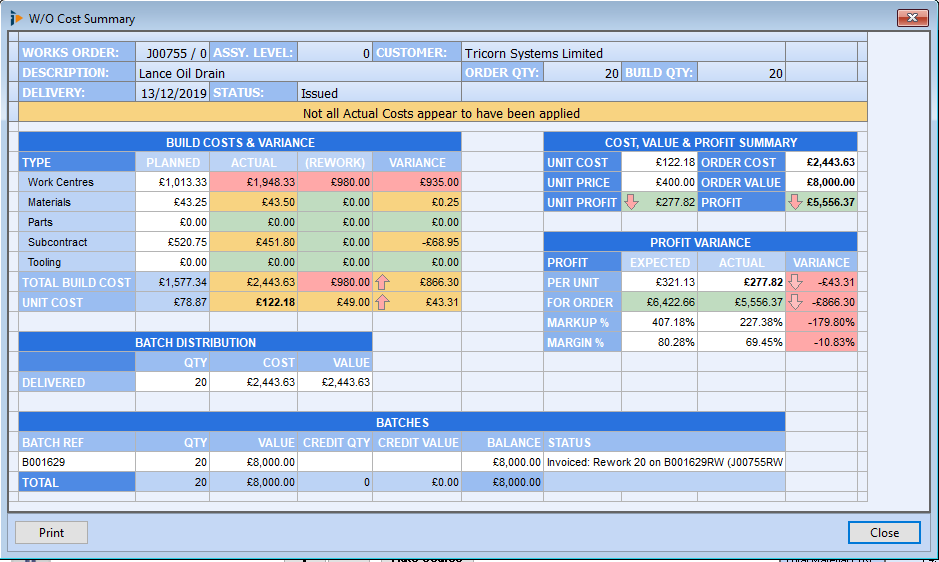
Use the Cost Summary Grid button to open the Print Screen.
Work Centres
To add a Work Centre (Operation) click on the + button, the Select Work Centres window will display all available centres; highlight the first then OK to continue.

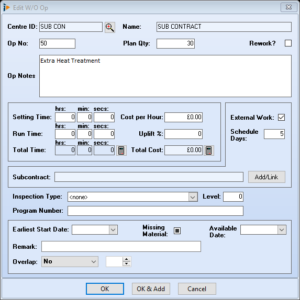
The Edit W/O Op window will open displaying any existing operation information, enter any related notes, setting time, run time and program number. Any pre-existing information relating to this operation will already be populated.

To add additional works centres and their related information, select the OK & Add button; this will open the select works centres window, continue until all operations are present.
Inserting an Operation
To insert an operation where operations are already loaded, for example whilst carrying out the job it was noted additional operations were required. Highlight the line below where the operation needs to be inserted. Right click to display further menu options.
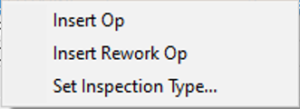
Select Insert Op – the Search for Works Centres window will open select the operation to be added.

When inserted this way and not resequenced the Op number will be a number between the two operations it now sits, for example in the above illustration a Clean operation was added between 50 and 60, therefore as this was the first to be added it takes 55. On the job card the operator will know this has been added for this job only, if the job requires the operation to be permanent then it is better to resequence the operations.
If the work centre is for subcontractor services, select the + button to add a new work centre. Within this window there is a tab Subcontract, select this to display all the subcontract services. Highlight required service, this will add a work centre of SUBCON and include all the treatment detail.

Once created indicate the number of days within the Schedule Days field, if this is not already populated from the works centre record. No time is required on subcon operations.
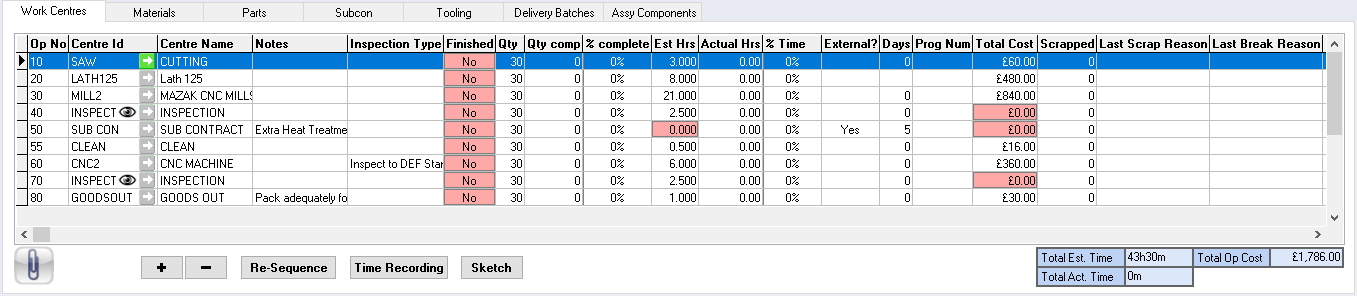
All work centres are visible in one grid table displaying all the essential information at a glance; it is possible to shift columns to suit personal requirements. Left click on the top of the column, keeping the left button depressed move the mouse to required position then release the button, whilst moving the column double arrows will indicate the column is being re-positioned.

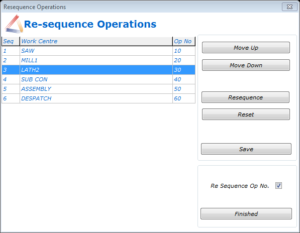
Re-Sequence
To re-sequence the work centres, select the Re-Sequence button where the Re-Sequence Operations window will open. Highlight the operation to be moved then using the move up, move down buttons reposition as necessary. Save the changes and select Finished to close window.
Time Recording
Sketch
Sketches related to individual operations can be displayed within the job card.
Select the Sketch button to open the Work Centre Sketch window, use the Load Sketch button to locate a bitmap only file.
Zoom Buttons
Use the button to open the relevant detail against the work centre.
Materials
To add a Material to a Quotation, click on the + button, the Materials database window will open highlight the required material, select OK to add to works order.
Use the search criteria to assist with retrieval of required information. See Material Search
A wild card can be used in the fields to limit the retrieval time, either as a prefix or suffix. Wildcard is set to * unless changed within Setup, contact Tricorn Systems for assistance.
Select the required Material then OK or Enter key to confirm the selection.
The Edit W/O Material window will appear; enter the unit quantity (the amount required to make one component). If no cost is pulled through from the database insert the unit cost per the Unit of Measure, it is ok to leave blank if the price is not important at this stage.
Select a Supplier from the drop down. Suppliers identified with a rating will appear at the top of the list, if the individual material has a star rating for this supplier this will appear above any other rating.
To add further materials, use the OK & Add button.
Sourcing Materials
To source materials, highlight the material select the Sourcing drop down to open the sourcing window.
Click Stock to source the material, the current stock level will be indicated within the sourcing window.
Highlight the stock batch to be used for the works order, if the quantity required is less than on the batch, any quantity remaining will be retained in stock. Any traceability records attached to the material batch will be brought through as required.
If insufficient stocks are available, the material can be ordered direct to the supplier using the Source button. Options available Add a new purchase order and purchase the required amount, Browse unfinished purchase orders and add the required amount, Add the required amount to an existing order for the identified supplier or Cancel the action.
Add new PO and buy xxxxx items
Selecting this option will open the New Purchase Order window. Insert the quantity required in addition to the works order requirement and the required date.
The sourcing record will update with the purchase order number, if the purchase order is to be printed or emailed, open the record using the green arrow button.
The purchase order will open where additional items can be used, using the Purchase Order Assistant or for stock.
Edit
The edit button will display all related traceability against the material, changes can be made accordingly.
Use the button to close the sourcing window
Zoom Buttons
Use the button to open the relevant detail against the material.
Auto Source
If strict traceability of material is not required it is possible to source materials from different batches, in this case use the Auto Source function where the following options are available:
- Source the Works Order
- Source all Works Orders with the same number (assembly)
- Source all Works Orders for the current Customer
- Source all Works Orders for all Customers
Parts
To add a part to a Works Order select the + button; this will open the Parts database window.
Use the search criteria to assist with retrieval of required information. See Parts Search
A wild card can be used in the fields to limit the retrieval time, either as a prefix or suffix. Wildcard is set to * unless changed within Setup, contact Tricorn Systems for assistance.
Select the required Part then OK or Enter key to confirm the selection.
The Edit W/O Part window will appear; enter the unit quantity. If no cost is pulled through from the database insert the unit cost, enter all other relevant information, to add further parts select OK & Add, alternatively OK to save and close the window.
Sourcing Parts
To source parts, highlight the part select the Sourcing drop down to open the sourcing window.
The current stock level will be indicated within the sourcing window, click Stock to source the part.
Highlight the stock batch to be used for the works order, if the quantity required is less than on the batch, any quantity remaining will be retained in stock. Any traceability records attached to the part batch will be brought through as required, this is displayed with a red balloon on the Document link button.
If insufficient stocks are available, the part can be ordered direct to the supplier using the Source button. Options available Add a new purchase order and purchase the required amount, Browse unfinished purchase orders and add the required amount, Add the required amount to an existing order for the identified supplier or Cancel the action.
Use the button to close the sourcing window
Edit
The edit button will display all related traceability against the part, changes can be made accordingly.
.
Check Stock
Before sourcing a part, it is possible to use the Check Stock button this will open, in print preview, a report of the current stock situation for all parts required.
Zoom Buttons
Use the button to open the relevant detail against the part.
Auto Source
If strict traceability of parts is not required it is possible to source parts from different batches, in this case use the Auto Source function where the following options are available:
- Source the Works Order
- Source all Works Orders with the same number (assembly)
- Source all Works Orders for the current Customer
- Source all Works Orders for all Customers
Subcontract
To add a Subcontract service, click on the + button, this will open the Subcontract window, select the required subcontract service, click OK to confirm.
The Edit W/O Subcon window will open where the quantity will be populated from the works order information with any minimum charge applied. Enter the unit cost and any surcharge to be included (surcharges could include delivery charges)
Enter any information relevant to the subcontract service in the notes field, standard text will be already present from the subcontract static data.
Add Op
Clicking on the Add Op button will display the Work Centre table, select the Subcontractor work centre, OK to confirm selection and continue.
The Edit W/O Op window will open, there is no requirement to add any detail, although adding operation notes to indicate the service the subcontractor is providing may be useful, select OK to close window. The External Work tick box will be ticked and if set against the work centre the amount of days scheduled for this operation, if no default is set insert the number of days.
A Subcontractor work centre will now be displayed in the work centre subtab.
Sourcing Subcontract Services
The sourcing of subcontract services is completed by raising a purchase order. Any relevant purchase order number will be displayed within the source reference column.
Source
A purchase order for the highlighted subcon requirement can be created using the Source button. Select the button to open additional options, if the subcontractor has been identified this will be included in the options.
Enter
Use this button to enter manual details
Edit
Use the button to close the sourcing window
The edit button will display all related traceability for the subcontract service, changes can be made accordingly.
Tooling
To add Tooling requirement and costs to the works order, click on the + button to open the Edit W/O Tooling window. Insert all relevant detail as necessary, select OK to save and close the window.
Sourcing Tooling
The sourcing of tooling is completed by raising a purchase order. Any relevant purchase order number will be displayed within the source reference column.
Source
A purchase order for the highlighted tooling requirement can be created using the Source button. Select the button to open additional options, if the supplier has been identified this will be included in the options.
Enter
Use this button to enter manual details
Edit
Use the button to close the sourcing window
The edit button will display all related traceability for tooling, changes can be made accordingly.
Delivery Batches
Before creating a Delivery Note the delivery batch needs to be activated (dependant on system setup), click in the delivery tick box, this will change the status of the delivery batch from Active to Active Set for Delivery.
Split Batches
If the works order is to be delivered in split batches it is possible to create these using the Split button.
Split into how many batches? – use the rocker switch to indicate how many batches
Qty per batch – enter the quantity for each batch
Default Workshop date – select from the drop down list the workshop sequence
Default Delivery date – select from the drop down list the delivery sequence
Additional batches can be created if the deliveries are to be split, select + to create a new batch, adjust the quantity accordingly. The outstanding balance will display on the new batch; notes can be added to individual batches for further reference.
Add to Stock
If any or the entire batch is to be added to stock, indicate the quantity, tick the Intended for Stock tick box then when ready Add to Stock button. Several popup windows will appear acknowledge each one accordingly, the parts will be added to stock and can be viewed within the Parts Database.
Hold
It is possible to put a batch on Hold, in this case enter the quantity to hold then select the Hold button. The quantity will be locked and not amendable. To take off hold select the Hold button a popup will appear to reverse the process.
Scrap
If a batch requires scrapping, select the Scrap button and the following popup will appear warning this operation cannot be undone.
Labels
To print a label for the batch, select the Label button.
Assembly Components (Production + only)
Assembly Components will only be active if there is a requirement to use the Tricorn Assemblies process.
See Assemblies for further information
How to Create a Works Order – Make for Stock
Select the Works Order button in the main menu, select the + button to start creating a new order.
The Customer name will be populated automatically, this customer is setup as the default in the parameter settings.
Use the looking glass button to open the customer search window, select relevant customer. If the customer does not already exist, use the button, to create a new customer account. Use the looking glass button to open the parts database; if the part is not already in the parts database use the button to add a new part record. If the part is ‘one off’ there may not be the requirement to include in the database therefore inserting the detail in the New Works Order window will suffice N.B. part detail entered within the works order will not update the parts database.
Continue creating the works order as per Creating a Standard Works Order